First aid is a fundamental skill that empowers individuals to provide immediate assistance and care in emergency situations. Whether you’re at home, work, in public spaces, or out in nature, knowing the basics of first aid can make a significant difference in saving lives and preventing further harm. This comprehensive guide will cover the essential principles, techniques, and considerations of first aid, equipping you with the knowledge and confidence to respond effectively when emergencies arise.
First aid is the initial care provided to a person who has been injured or has suddenly fallen ill. Its primary goals are to preserve life, prevent the condition from worsening, and promote recovery. In many cases, the first few minutes following an injury or medical incident are critical, and immediate action can significantly impact the outcome.
Here are some key reasons why first aid is essential:
While first aid is primarily about helping others in need, there are legal and ethical aspects to consider when providing assistance. Here are a few important points to keep in mind:
When responding to an emergency, following a systematic approach is crucial to ensure that you cover all necessary steps and provide the most effective care. The primary principles of first aid include:
Before approaching the injured or ill person, assess the scene for potential hazards such as fire, chemical spills, or electrical hazards. Ensure your safety and the safety of others.
Gently tap the person and shout, “Are you okay?” If they do not respond, assume they are unresponsive.
If there are other people present, instruct someone to call emergency services (e.g., 911) or activate the local emergency response system. Clearly communicate the nature of the emergency.
Approach the person cautiously, keeping an eye on any potential hazards. If you suspect a hazardous environment (e.g., a chemical spill), do not enter without proper protective equipment.
Perform a quick primary assessment to check for life-threatening conditions, primarily focusing on the ABCs: Airway, Breathing, and Circulation.
Ensure that the person’s airway is open and not blocked by foreign objects. If there is an obstruction, attempt to clear it using appropriate techniques.
Check for signs of breathing (chest rise and fall). If the person is not breathing, provide rescue breaths. If you are not trained in CPR, continue monitoring and await professional help.
Check for signs of circulation, such as a pulse or normal colour in the extremities. If there are no signs of circulation, begin CPR if trained to do so.
If the injured or ill person is breathing and has no signs of a spinal injury, place them in the recovery position. The recovery position helps maintain an open airway and prevents choking on vomit or fluids. Here’s how to do it:
By following these primary principles of first aid, you can quickly assess the situation, provide initial care, and ensure the safety of both the injured person and yourself. In the following sections, we will delve into common first aid situations and techniques for specific injuries and illnesses.
First aid encompasses a wide range of skills and techniques tailored to specific injuries and illnesses. Understanding how to respond to common situations is essential. Here, we’ll explore the basics of first aid for various scenarios.
Steps to Follow:
Steps to Follow:
Steps to Follow:
Steps to Follow:
Steps to Follow:
Steps to Follow:
Steps to Follow:
Steps to Follow:
These common first aid situations cover a range of emergencies you may encounter in daily life. However, it’s crucial to remember that the information provided here is a general guideline. In many cases, professional medical help should be sought immediately or as soon as possible, especially for severe injuries or illnesses.
In the following sections, we’ll delve into specific first aid techniques, including cardiopulmonary resuscitation (CPR) and more, to equip you with a broader understanding of first aid principles and practices.
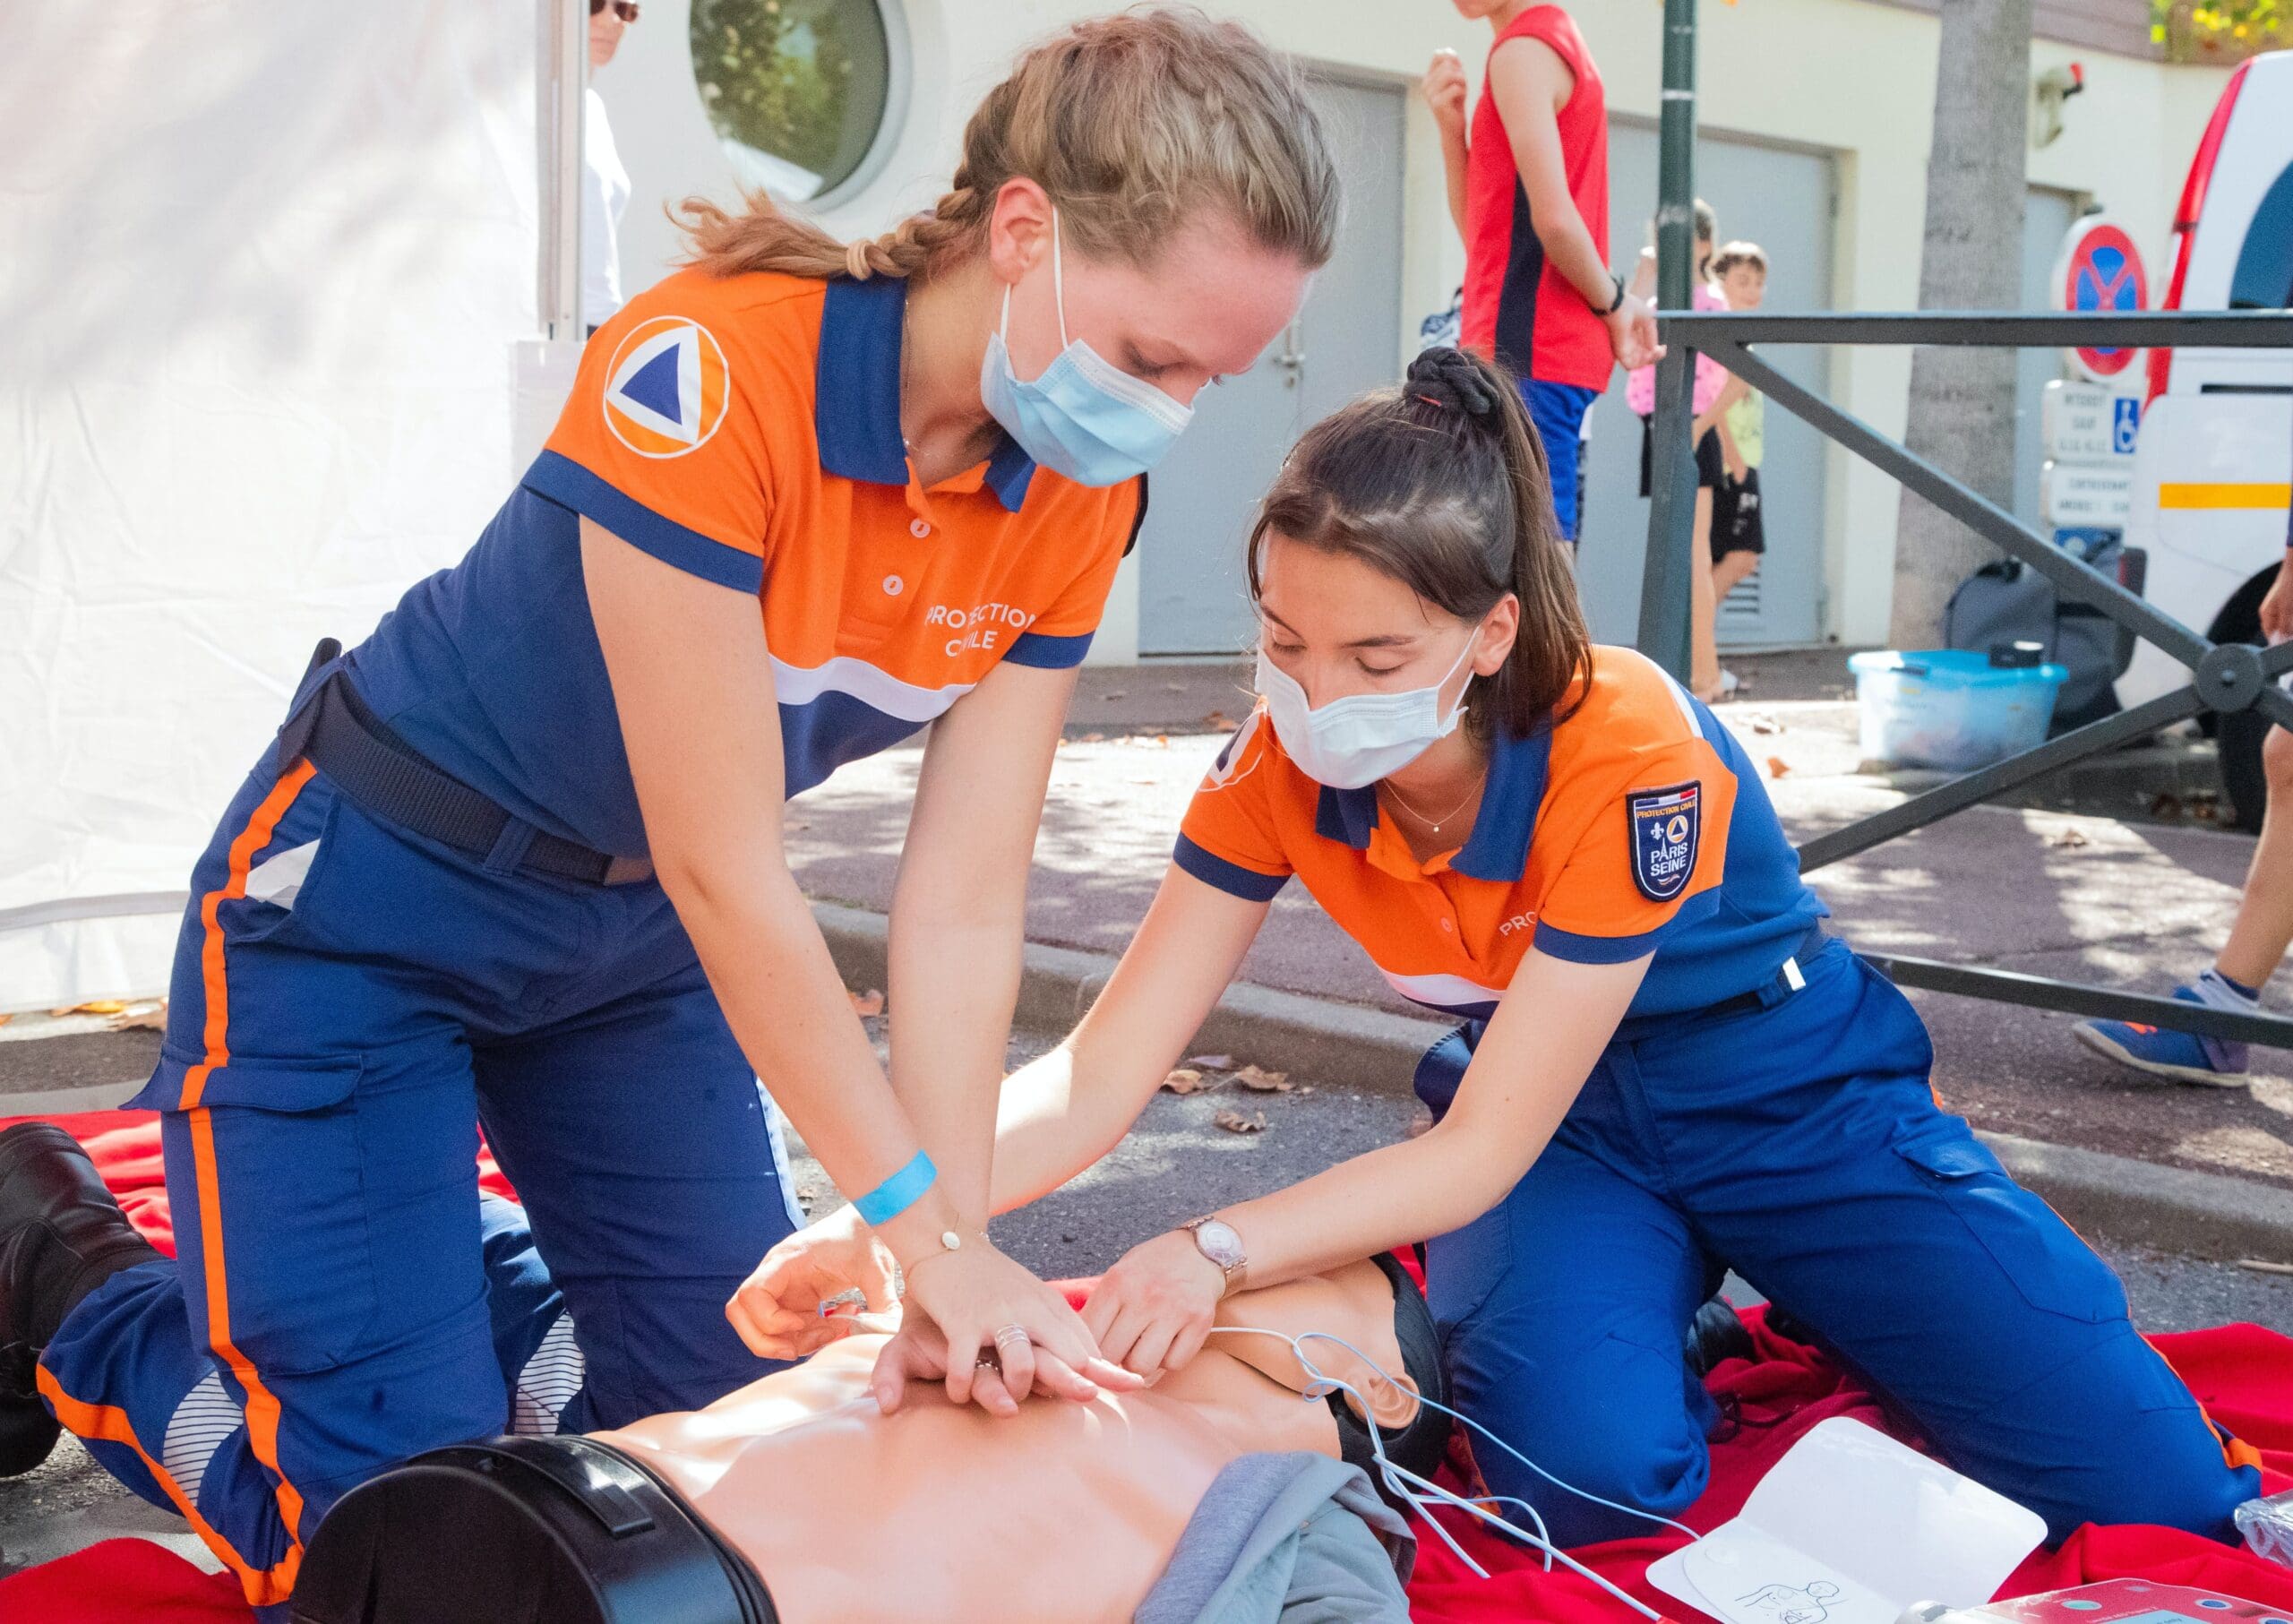
Cardiopulmonary Resuscitation (CPR) is a life-saving technique used to revive an individual whose heart has stopped beating (cardiac arrest) or who has stopped breathing. CPR involves a combination of chest compressions and rescue breaths to circulate oxygenated blood throughout the body. Knowing how to perform CPR is a critical skill that can make the difference between life and death in an emergency. Here, we’ll cover the basics of CPR.
CPR serves two primary purposes:
Chest compressions are used to manually pump blood through the body, delivering oxygen to vital organs, including the brain.
Rescue breaths deliver oxygen to the person’s lungs, which is then circulated to the rest of the body through chest compressions.
CPR should be administered if you encounter a person who is unresponsive and not breathing normally. Follow these steps:
Tap the person and shout, “Are you okay?” If there is no response, consent is implied and there is no need to ask for consent to perform CPR.
If someone else is present, instruct them to call 911 or your local emergency number. If you are alone, call for help after starting CPR.
Place the heel of one hand on the centre of the person’s chest, just below the nipple line. Place your other hand on top and interlock your fingers. Position your shoulders directly above your hands. Keep your elbows straight and use your upper body weight to compress the chest downward at least 2 inches (5 centimetres) deep at a rate of 100-120 compressions per minute. Allow the chest to fully recoil between compressions.
After 30 chest compressions (or about 2 minutes if you are alone), give two rescue breaths. Tilt the person’s head back slightly, pinch their nose shut, and give a breath that lasts about 1 second and makes the chest rise visibly. Repeat for the second breath.
Continue with cycles of 30 chest compressions followed by 2 rescue breaths. Keep performing CPR until the person starts breathing on their own, medical professionals arrive, or you are too exhausted to continue.
If an Automated External Defibrillator (AED) is available, it should be used in conjunction with CPR for the best chance of survival. AEDs are user-friendly devices that provide automated instructions for administering an electrical shock to the heart to restore a normal rhythm.
CPR for infants (under 1 year old) and children (1 to 8 years old) differs slightly from adult CPR. In these cases, it’s essential to use gentler compressions and provide rescue breaths with less force:
Remember that receiving proper CPR training from a certified instructor is essential to ensure you can perform this life-saving technique effectively and confidently. CPR courses typically include hands-on practice, and certification is often required for certain professions, such as healthcare providers and lifeguards. Keep in mind that CPR is physically demanding, so it’s crucial to maintain your skills and stay up-to-date with the latest guidelines through regular training and certification renewal.
While the fundamental principles of first aid apply universally, certain situations and populations require specialized knowledge and techniques. In this section, we’ll explore specific considerations in first aid that cater to the unique needs of various individuals and scenarios.
Pediatric first aid focuses on providing care to infants and children, addressing their unique medical and emotional needs. Children’s bodies and physiology differ from adults, making it essential to adapt first aid techniques accordingly. Here are some key considerations:
Understanding common paediatric emergencies such as choking, seizures, fever, and allergic reactions is crucial for prompt intervention.
When performing CPR on an infant or child, use child-appropriate compression depths and provide rescue breaths gently. The Heimlich manoeuvre for choking in children may differ from that for adults.
Children may become frightened during emergencies. Providing comfort, reassurance, and age-appropriate explanations is essential for reducing their anxiety.
Recognizing potential hazards in homes and childcare settings is vital to prevent accidents and injuries in children.
Elderly individuals often have unique health concerns, including chronic medical conditions and mobility issues. When providing first aid to the elderly, consider the following:
Falls are a common concern among the elderly. Be proactive in reducing fall risks by removing hazards and ensuring proper lighting.
Elderly individuals may take multiple medications. Be aware of potential drug interactions and adverse effects during emergencies.
Patients with Alzheimer’s or dementia may require specialized communication and patience during emergencies.
Understand how to assist individuals who use mobility aids such as walkers, canes, or wheelchairs during emergencies.
Mental Health First Aid teaches individuals how to provide initial support and assistance to those experiencing mental health crises. The goal is to reduce stigma and foster understanding of mental health issues. Key points include:
Learn to recognize signs of mental health challenges such as depression, anxiety, and suicidal thoughts.
Be prepared to listen non-judgmentally, offer reassurance, and guide individuals to seek professional help when needed.
Understand the importance of self-care for both the individual providing assistance and the person experiencing the crisis.
Learn techniques for de-escalating situations and promoting a sense of safety.
Workplace first aid focuses on addressing injuries and illnesses that can occur in occupational settings. Employers often provide first aid training and establish designated first aid stations. Considerations include:
Recognize the specific hazards associated with the workplace, such as machinery, chemicals, or ergonomic risks.
Ensure the workplace is equipped with appropriate first aid kits and supplies, and that employees know their locations.
Familiarize yourself with the company’s injury reporting procedures and how to provide immediate care until professional help arrives.
In many workplaces, employees are trained in the use of Automated External Defibrillators (AEDs) and CPR to respond to cardiac emergencies.
Wilderness first aid is tailored for outdoor enthusiasts, hikers, campers, and anyone venturing into remote areas where access to professional medical care may be limited. Key considerations include:
Recognize the unique dangers of the wilderness, including exposure to extreme weather, wildlife encounters, and terrain-related injuries.
Wilderness first aid often includes basic survival skills, such as shelter building and navigation.
Prepare for limited access to medical supplies and learn how to improvise using available materials.
Understand how to initiate evacuations in remote locations and communicate with emergency services when necessary.
Specialized first aid training and knowledge are essential in these specific situations to ensure the best possible outcomes when providing assistance. Tailoring your skills to the unique needs of these populations and scenarios enhances your effectiveness as a first aid provider.
Having the right first aid equipment readily available is essential to effectively administer first aid in various situations. Proper equipment can help you provide immediate care and prevent further harm. In this section, we’ll explore the essential first aid items and resources you should consider having on hand.
A well-stocked first aid kit is the cornerstone of your first aid equipment. You can purchase pre-made kits or assemble your own to meet your specific needs. Here’s a list of essential items for a basic first aid kit:
Various sizes, including small, medium, and large, to cover wounds and abrasions.
Used to dress larger wounds and control bleeding.
Secures dressings and bandages in place.
For cleaning wounds and preventing infection.
Scissors are handy for cutting tape and gauze, while tweezers can help remove splinters or debris from wounds.
Protects both the first aider and the injured person from the risk of infection.
To monitor body temperature and identify fever.
Over-the-counter pain relievers like acetaminophen or ibuprofen.
Provides a sanitary barrier when performing mouth-to-mouth resuscitation.
Provides guidance on administering first aid.
Remember that you can customize your first aid kit based on your specific needs, such as adding items like an epinephrine auto-injector (EpiPen) for allergies or specific medications for known medical conditions.
Creating a home first aid kit is a practical step to ensure you’re prepared for minor injuries and medical needs at home. Here’s how to assemble one:
Choose a sturdy, waterproof container with compartments or dividers to keep items organized.
Collect the essential items listed above, and consider any additional items you may need based on your family’s medical history and activities.
If you include prescription medications, ensure they are labelled with the name, dosage, and expiration date.
Add personal items such as a list of emergency contacts, medical history, and any specific medical instructions.
Regularly check and replace items with expired dates or those that have been used.
Keep your first aid kit in a location that is easily accessible to all family members. Common places include the kitchen, bathroom, or a central hallway closet.
Maintaining your first aid kit is as important as having one. Here are some maintenance and renewal tips:
Check your first aid kit periodically to ensure all items are in good condition and within their expiration dates.
Promptly replace any items that have been used or have expired.
Update emergency contact information, medical history, and medication lists as needed.
Regularly review and practice first aid techniques to ensure you remain confident and competent in providing assistance.
If you live in an area with distinct seasons, adjust your first aid kit contents to address seasonal concerns such as allergies, sunburn, or frostbite.
As your family’s needs change, modify your first aid kit accordingly. For example, if you have young children, include items like child-sized bandages.
Having a well-maintained and readily accessible first aid kit empowers you to respond effectively in minor emergencies and provides peace of mind knowing you have the necessary supplies at hand.
In the next section, we’ll explore the importance of proper training in first aid and how to find the right course for your needs.
While having a well-equipped first aid kit is essential, knowing how to use its contents effectively is equally crucial. Proper training in first aid not only equips you with the knowledge and skills to provide assistance but also increases your confidence in emergency situations. In this section, we’ll discuss the importance of training and guide you on how to find the right first aid course.
When seeking first aid training, it’s important to choose a course that aligns with your goals, needs, and level of expertise. Here are steps to help you find the right course:
Consider why you want to learn first aid. Are you interested in basic first aid for home and family use, or do you need professional-level training for your job?
Look for accredited organizations and providers that offer reputable first aid courses. Some well-known organizations include the American Red Cross, American Heart Association, St. John Ambulance, and the British Red Cross.
Different courses cater to various skill levels. Common course levels include:
Ensure that the instructors are certified and experienced in teaching first aid.
Consider the time commitment required for the course. Some courses can be completed in a few hours, while others may span multiple days.
Determine if certification is a requirement for your specific needs. Many workplaces and organizations require first aid certification, which typically needs to be renewed every few years.
Review the course content to ensure it covers the topics you’re interested in or need for your specific situation.
Participating in a first aid course offers numerous benefits, including:
Learning how to respond to emergencies can save lives in critical situations.
Training boosts your confidence in your ability to provide assistance effectively.
You’ll gain a better understanding of safety practices and risk prevention.
In some cases, having first aid training may provide legal protection if you assist someone in need.
Many employers require first aid certification for specific job roles, such as healthcare workers, teachers, and lifeguards.
Being trained in first aid allows you to contribute positively to your community by helping others in emergencies.
First aid certification typically has an expiration date, so it’s important to renew your certification as needed to stay current with the latest techniques and guidelines. The renewal period varies depending on the organization and the level of certification but is often every 2 to 3 years.
To maintain your certification:
Many organizations offer shorter refresher courses that focus on key skills and updates.
Keep up-to-date with changes in first aid guidelines, practices, and equipment.
Regularly practice first aid techniques to ensure you retain your skills.
Be proactive in renewing your certification before it expires to avoid a lapse in your first aid knowledge and skills.
First aid training is an investment in your own safety and the well-being of those around you. Whether you’re seeking basic skills for home and family or advanced training for a specific profession, the knowledge and confidence gained from first aid courses can have a significant impact in emergencies.
Congratulations! You’ve completed this comprehensive guide on the basics of first aid, equipping yourself with the knowledge and confidence to respond effectively in emergency situations. From understanding the importance of first aid to mastering specific techniques, you are now better prepared to make a difference in the lives of those in need.
Here’s a quick recap of the key takeaways:
First aid is about preserving life, preventing further harm, and promoting recovery. It plays a critical role in emergency situations.
The primary principles of first aid include assessing the scene, checking for responsiveness, calling for help, and providing initial care based on the ABCs: Airway, Breathing, and Circulation.
You’ve learned how to respond to common emergencies like cuts, burns, fractures, choking, allergic reactions, heat-related and cold-related illnesses, and poisoning.
Cardiopulmonary Resuscitation (CPR) is a vital life-saving technique that involves chest compressions and rescue breaths to revive someone whose heart has stopped or who has stopped breathing.
We discussed the unique needs and techniques for podiatric first aid, first aid for the elderly, mental health first aid, first aid in the workplace, and first aid in wilderness and remote environments.
You’ve explored the essential items for a first aid kit and how to assemble and maintain one.
The importance of proper training in first aid cannot be overstated. Finding the right course, obtaining certification, and renewing it as necessary are key steps in your journey to becoming a capable first aid provider.
Remember that first aid is not only about the skills you’ve acquired but also about your willingness to take action when needed. In an emergency, staying calm, calling for help, and providing care to the best of your ability can make all the difference.
We hope this guide has empowered you to be proactive in learning and applying first aid techniques. By doing so, you are contributing to the safety and well-being of your community and loved ones. Continue to stay informed, practice your skills, and be ready to lend a helping hand when it matters most.
Thank you for taking the time to learn about the basics of first aid. Your commitment to preparedness and compassion for others are invaluable qualities that can truly make the world a safer place.